This blog post was co-authored with Germán Goldenstein.
At AgilityFeat we strongly believe that our technical success in building products is based on the combination of meticulous software engineering practices and a simple, yet powerful, software design.
We are always looking for ways to motivate our developers to write code that follows a simple design. A simple (although not simplistic) design leads to maintainable and resilient code. The kind of code we are looking for:
- has low coupling: modules don’t have dependencies between them.
- has high cohesiveness: a module does only the thing that he is supposed to do, no more.
- is readable: “Always code as if the guy who ends up maintaining your code will be a violent psychopath who knows where you live.”
- uses high levels of abstraction to manage complexity.
In other words, at AgilityFeat we build software products that bring a competitive advantage to our clients in terms of rapid feature implementation.
The Case for Lisp
Back in 2001, Paul Graham famously confessed that the functional programming language Lisp was the secret weapon that gave him such a competitive advantage during his days as a start-up founder.
Paul makes an argument in favor of using Lisp:
- “[…] it follows inexorably that, except in special cases, you ought to use the most powerful [language] you can get.”
- “[…] the only programmers in a position to see all the differences in power between the various languages are those who understand the most powerful one.”
- “[Lisp] is simply the most powerful language available”
- “[…] because Lisp was so high-level, we wouldn’t need a big development team, so our costs would be lower. If this were so, we could offer a better product for less money, and still make a profit.”
Implicitly Paul was predicting that lots of features that Lisp already had in the 60’s or 70’s would be slowly adopted in modern languages as a proof of its superiority.
A Functional Programming Renaissance
Surely, fifteen years later, we have seen how Functional Programming has had a strong revival, not only because of the abstraction power at managing complexity, but also because it is really useful in keeping integrity and good performance in distributed systems. When you have a distributed infrastructure, your program needs to behave exactly the same every time and it needs to operate in a way where its tasks can be shared across of thousands of instance machines.
There is a significant number of Functional Programming concepts that were first introduced decades ago in Lisp and now are enabled and the recommended standard in languages like Ruby, Python, Javascript, Swift, Java and C#. These concepts include immutable values, no side-effects, higher-order functions, currying, recursion, lazy evaluation, functions as objects, lambda statements, closures, decorators….
For Paul Graham, one particular feature that set Lisp apart is macros: the ability of write a program that can manipulate, or deal with another program, exploiting the homoiconicity of Lisp code.
We are not going to go any deeper regarding macros, for now, because as Paul said: “It would be convenient here if I could give an example of a powerful macro, and say there! how about that? But if I did, it would just look like gibberish to someone who didn’t know Lisp; there isn’t room here to explain everything you’d need to know to understand what it meant. In Ansi Common Lisp I tried to move things along as fast as I could, and even so I didn’t get to macros until page 160.”
Let’s Imagine a Walking Skeleton
The one thing we are going to do now is to imagine that we are required to build a privacy communication platform based on PGP cryptography, in Clojure. Being a Lisp dialect, Clojure is an excellent choice for getting into the Functional Paradigm.
For educational purposes, we will skip all the specifications of a formal requirement list and please let’s assume that the following Walking Skeleton sums up all the technical risks we want to address during the Iteration 0 of this imaginary project.
Let me emphasize this: We will not build a Walking Skeleton for a real world project. We will build a Walking Skeleton whose complexity could be equivalent to the complexity of a real world project.
We will build our Walking Skeleton, step by step. It will take a lot of patience. Don’t panic! Grab your towel!
You can take a look at the code and the working demo here:
– Demo deployed in Heroku: http://agilityfeat-challenge.herokuapp.com
– Frontend code: https://github.com/agilityfeat/clojure-pgp-skeleton-front-end
– User’s Microservice code: https://github.com/agilityfeat/clojure-pgp-skeleton
Let’s start!
But… What is a ‘Walking Skeleton’?
Let’s try to explain what a Walking Skeleton is quoting the following definition by Alistair Cockburn:
“A Walking Skeleton is a tiny implementation of the system that performs a small end-to-end function. It need not use the final architecture, but it should link together the main architectural components. The architecture and the functionality can then evolve in parallel.”
Why should kickstart your next project with a Walking Skeleton? Because the main source of failure in any software project is integration of your domain application with the rest of the world. Think of any API, library, architecture decision, new technology in the back-end or front-end. Think of all the integration points and then make them part of your Walking Skeleton specification. Addressing the most risky part of your project at the beginning is in many orders of magnitude cheaper than later, when is usually too late to have any wise reaction when integrations go wrong.
Important clarification: The main objective of implementing a Walking Skeleton is obtaining a huge amount of learning after the feedback loop is completed, namely, after the Walking Skeleton is completed. The beauty of the code or the visual design is not important at this stage. We want you to get your hands dirty with Clojure first. Once the Iteration 1 starts, beautiful code and beautiful designs are paramount. Ugliness perpetrators shall be persecuted!
Let’s see a User Story that specifies our kind of meaty Walking Skeleton:
As a final user I want to create an account with a PGP public key, that I already possess, so when the account is created the Welcome page is decrypted on the client’s side.
- All the backend code must be in Clojure and it should use the Tesla microservices architecture from Otto.
- All the Javascript code must be generated from ClojureScript
- Use OpenPGP.js.
- The frontend must use React with Reagent following a Flux [or Reflux] architecture.
- It should be a Responsive Design, mobile first.
Let’s analyze what we should do:
- We must create an app in Clojure, where a user can sign up using a PGP public key previously generated. This public key will be used in the backend side to encrypt the welcome page. The welcome page will be decrypted from the client side using the OpenPGP.js library, which will require the user to enter his private key at the time of receiving the encrypted message from the backend.
- The backend must be developed in Clojure using Tesla micro-services architecture developed by Otto. We will talk about Tesla – Microservices later, but for now just keep in mind that the backend must be implemented as a micro-service which receives data (the username and the public key), stores the data in a database, and then returns the welcome page encrypted with PGP. In the repository you will also find the Login part, which is not included in this document for practical reasons.
- To build the frontend, we must use ClojureScript for generating all the Javascript code. We will also use Reagent for handling the DOM with React.js from ClojureScript, using the logic of Flux. Finally, we must keep in mind that the site should be Responsive.
Click the next chart if you want to visualize the whole process:
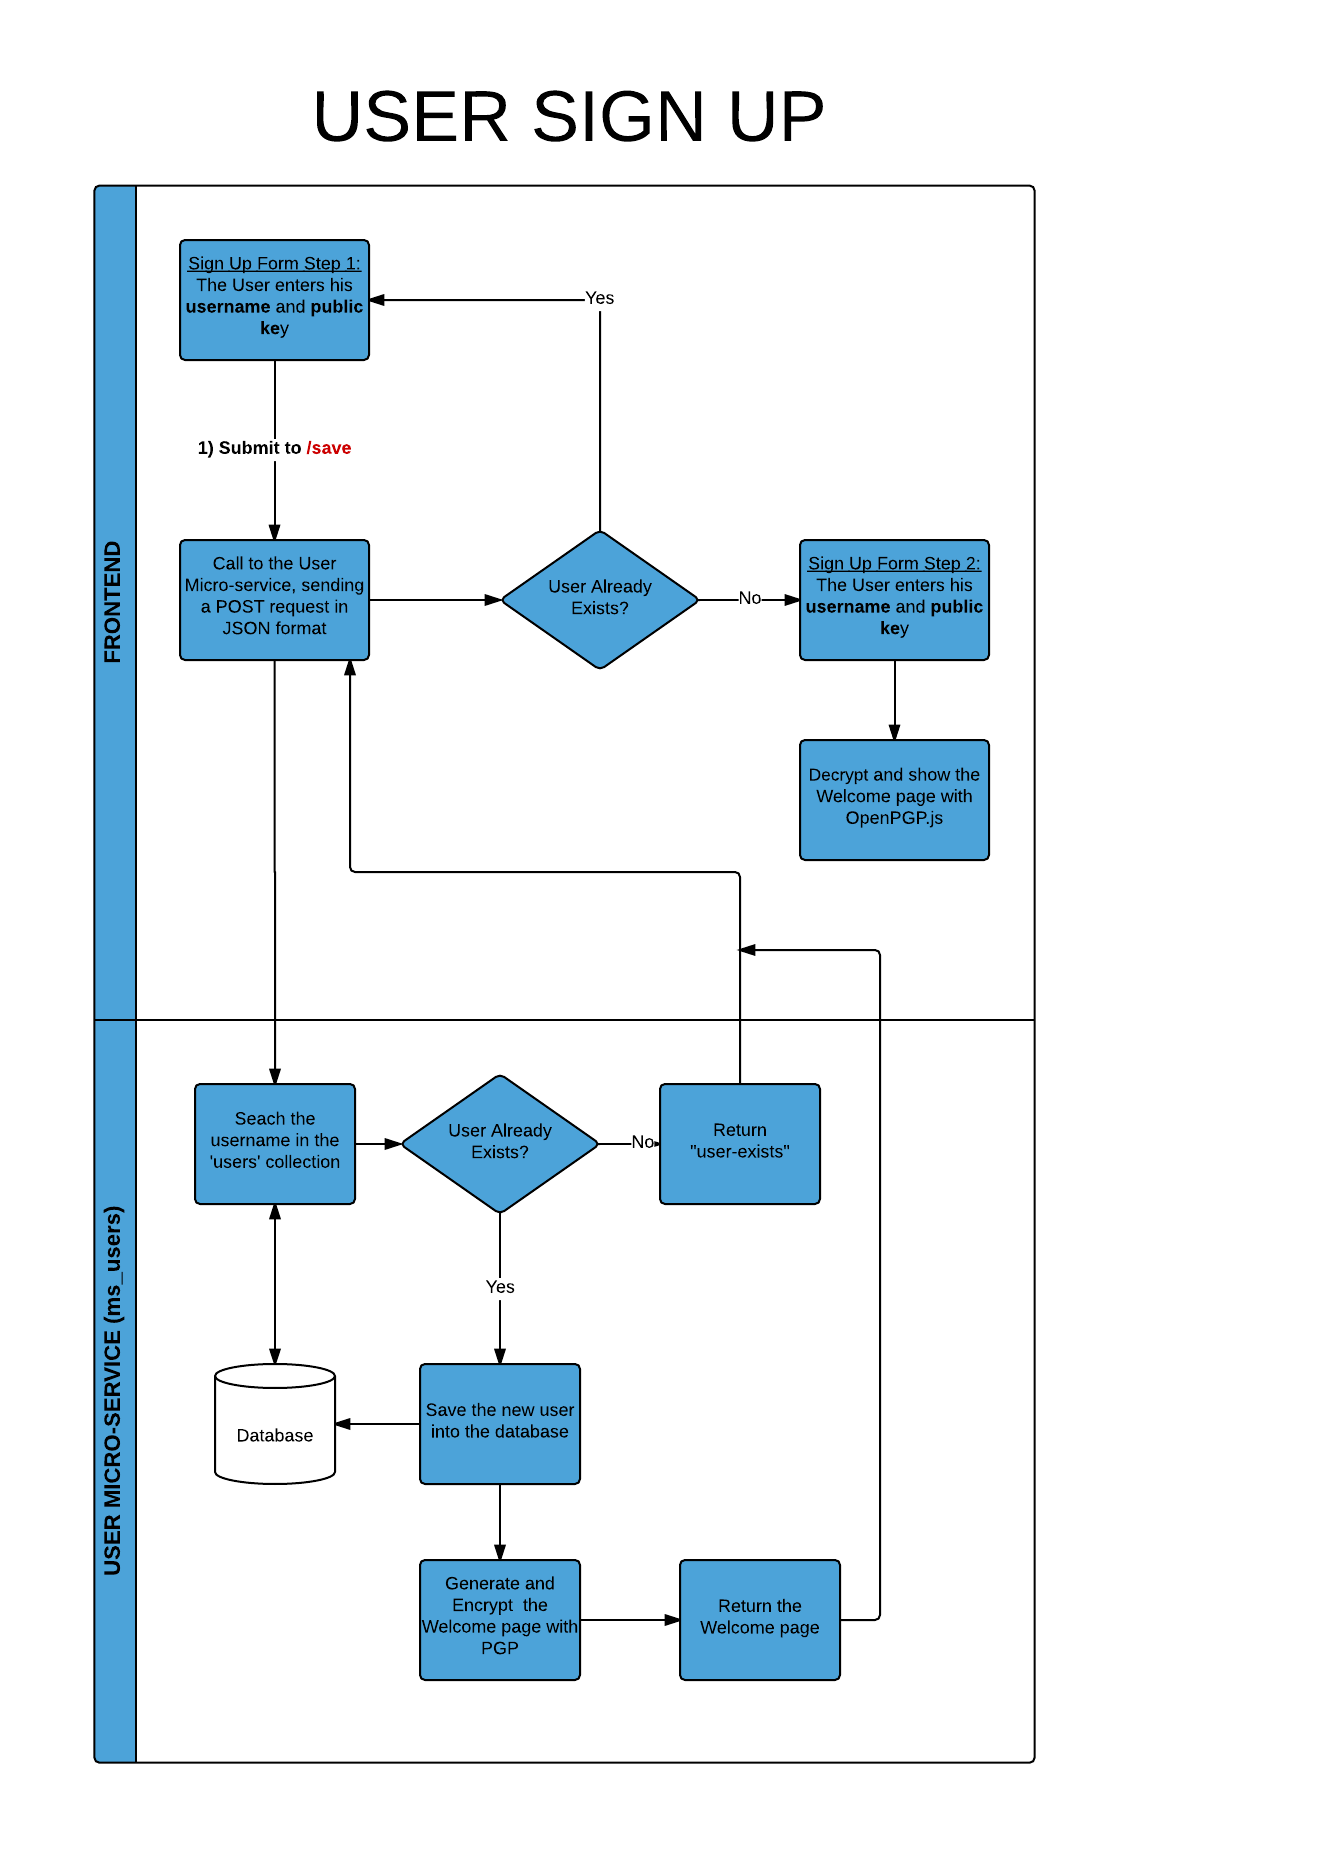
Clojure Walking Skeleton
Read a Lot, Learn, and Read More!
Before we start, we want to recommend some useful sites and tutorials that can help the Clojure novice in her quest for greatness:
Clojure:
- Getting Started with Clojure: http://clojure-doc.org/articles/tutorials/getting_started.html
- Leiningen: http://leiningen.org/
ClojureScript: Modern ClojureScript tutorials: https://github.com/magomimmo/modern-cljs
Reagent: Official page http://holmsand.github.io/reagent/
Flux: Flux Overview: http://facebook.github.io/react/docs/flux-overview.html
Tesla-microservices:
- GitHub Repo: https://github.com/otto-de/tesla-microservice
- Otto’s Blog: http://dev.otto.de/2015/01/30/we-released-the-basis-for-our-clojure-microservices/
- Component Framework: https://github.com/stuartsierra/component
A quick review of the required technologies
These are the most interesting features in Clojure:
- Clojure is a general-purpose language, with an emphasis on functional programming. This is a programming paradigm that treats all as the evaluation of functions, mostly written between parentheses.
- Also, Clojure works with immutable data structures, which means that once a data structure has been created, It can’t be changed. If you add or remove something from an immutable collection, you would get a new one. A data structure can be shared among different concurrent threads without concurrent modification exceptions.
- Using mutable structures make it really difficult to come up with a source code debug looking for the error line where the value of an object was changed. By having immutable data structures, it is guaranteed that every time you call a function with the same arguments it will return the same value.
- Clojure is a hosted language. It’s a compiled language and it runs on Java Virtual Machine, so we can take advantage of the Java libraries!
- Using Leiningen, we have a great tool for experimenting with code called REPL (Read-Eval-Print Loop). You can type code into it, and then REPL evaluates it and prints the result. It will enable you to quickly check your functions behavior, and we strongly recommend its implementation.
- With ClojureScript you can convert your Clojure code into Javascript!. This means that you could take advantage of the Clojure language features (such as immutability, data structures) and you have a new way to write Javascript code without typing plain code.
- With Reagent, you will find a new way to write efficient React.js components using ClojureScript functions, even faster than plain old javascript React code. Reagent use the Hiccup syntax to write HTML code, and we were pleasantly surprised at the simplicity of representing HTML within Clojure.
Let’s start coding
Stage 1: Create the Clojure Environment
To start developing with Clojure, you must have installed Leiningen.
To install it, follow these steps ( Copied from http://leiningen.org/#installg ) :
- Download the lein script (or on Windows lein.bat)
- Place it on your $PATH where your shell can find it (eg. ~/bin)
- Set it to be executable (chmod a+x ~/bin/lein)
- Run it (lein) and it will download the self-install package
Stage 2: Create the micro-service (backend)
Create the new project with “lein new ms_users”.
This will create the basic structure of a clojure project with the default template.
Configure dependences in the project.clj file.
To build this backend, we need to include several dependences:
- Tesla-microservices
- Component Framework
- Ring Codec (this is helpful to convert form-params like “a=1&b=2” to a map {:a 1 :b 2})
- PGP libraries (to encrypt the welcome page)
- A data base library. We chose MongoDB for this exercise.
So, the dependencies declaration in the project.cls file should look like this:
About Tesla-microservice
According to the Walking skeleton definition, we must use the Tesla micro-services architecture. Tesla microservices is the common basis for some of otto.de’s microservices. It is written in clojure using the component framework. These are the features included:
- Load configuration from filesystem.
- Aggregate a status and application health.
- Deliver a json status report.
- Report to graphite using the metrics library.
- Manage routes using compojure.
- Serve content with an embedded jetty.
You can see the code Tesla Micro-services and an example of how to use it on github: https://github.com/otto-de/tesla-microservice
Create a Database
For the purpose of this Walking Skeleton, We chose to use MongoDB as it is one of the most used NoSQL Engine DB. To install it locally, We recommend reading the following link: http://docs.mongodb.org/manual/tutorial/getting-started/ Once installed, create the src/db/core.clj file where we are going to write the code to connect to the database, and perform some basic database operations. To create a DB connection, we can do it as follows:
We must create an environment variable “MONGOLAB_URI” with the value of the local database URI. This is used to run the app in different environments (development, staging, production, etc ) . In our case, my local URI is mongodb://127.0.0.1/ms_users
Now add two more functions to retrieve and insert users:
The function create-user receives a Clojure Map, and saves it in the collection “users”. The function get-user receives a username (string) and searches in the collection “users” the document (record) that matches with that username.
Create the main function, and define the user-system component.
Let’s start with the example of Tesla. It all starts in the example_system.clj file.
In this file it is defined the -main function, which is the entry point to the app, and also defines the system component example-system. The main function, starts the example-system component.
What is a Component? The Component framework use components. A component is a collection of functions or procedures which share some runtime status. A component is defined as a Clojure Record implementing the Lifecycle protocol, which requires defining the start and stop of the component.
Components are composed into systems. A System is a component which knows how to start and stop other components.
In this case, the System example-system includes the example-page component (developed in example_page.clj ) and calculator component (developed in calculator.clj) .
We will use this example to create our code. We will create the system user-system, which will contain the component user-component which is where we will write the main code of the Sign up.
Our code will look like this:
Notice that the namespace changed to ms-users.user-system, and the :require part now includes the user-component that we have to write now. On the other hand we add the key :server-port to the map that we send as a parameter to the system/empty-system, with the value (or (System/getenv “PORT”) 8080). The function System/getenv reads the environment variable “PORT ” to start the jetty server. If this variable is not set in our environment, then we will use the port 8080 by default. Environment variables are useful for working with different environments. We will write this code in the src/user_system.clj file. The file name must match the name of the namespace. It’s important to know that the “-” namespace should be replaced by “_” symbol in the file name.
Create the user-component
Let’s create the file src/user-component.clj. One more time, we are going to learn how to write a component with the Tesla example. To do this, we should look at the file src/example-page.clj A component is defined as follows:
In this example, Compojure (one of the features into Tesla) is used to define system routing.
These routes are defined in the start of this component.
We see that if we run http://localhost:8080/example/ the usage-page function will get executed.
If we go to http://localhost:8080/example/foo/ the function result-page will be executed.
Now that we understand how we have to create our user-component, we are going define a route “/signup” that receives the POST request with the username and public key, and calls a function that performs the user sign up and returns the welcome page encrypted.
The component is now as follows:
Define the function “signup-user”.
This function will take care of starting the registration process:
- Get the user data from a POST request (username and public key)
- Save the user data in the database
- Encrypt the welcome page, which for our example, is going to be a simple welcome message.
- Return the welcome page in json format.
Ok, let’s start with the signup-user
This function receives the parameters and returns to Compojure the welcome page encrypted in json format. In order to format the welcome page in json, we have to add in :require the library [clojure.data.json :as json :only [write- str] ].
The welcome page encrypted is generated by the welcome-page-signup function, that is written below:
This function receives the “body” parameter in the format “var1=1&var2=2”. We are going to turn it into a map {:var1 1 :var2 2} to read it more easily. We’ll do this in the line (def form (utils/getmap body)) This utility function (and some others) will be defined in the utils.clj file, and to use it we need to add the namespace in :require of user_component.clj like this: [ms-users.utils : as utils]. Our utils.cljs file is now as follows:
Let’s go back to the welcome-page-signup function.
In the line (if (register-user form) we check the boolean value returned by the register-user function. This value will be true when the user was successfully inserted, and it will be false if it wasn’t. If the username already exists in the database, then it will return the “user-exists” error message . If it doesn’t exist, then perform the insert in the database, and returns the welcome page generated by the encrypt-message function.
Now, let’s write the register-user function:
Good! We’re almost there. Now we need to create the function encrypt-message that will be responsible for generating the welcome page and return it encrypted.
As we see, this function generates the welcome page in message with the text “Welcome name! Your registration was successful ! ” .
Then, we call the function that performs the encryption. The function utils/get-encrypted-message will be defined in utls.clj because we might need to re-use it later in another function.
So, we define this function in utils:
Setup the project.clj
To run this app, we have to finish the configuration of project.clj file. Add these lines:
– :main key is to indicate where the main function is.
– :clean-targets indicates the folder where the files are going to be deleted when you run “lein clean”
– :source-paths by default is “src”
– :uberjar-name indicates the filename of the .jar file generated when you run “lein uberjar”
You can see the complete code (with the Login part) in the repo.
Stage 3: Create the frontend app
Let’s use Luminus. It is just what we need.
With a simple “lein new luminus my-app” you have a frontend project basis.
Also, Luminus has different project templates (see http://www.luminusweb.net/docs/profiles.md).
As defined by our Walking Skeleton, we need to build the frontend with ClojureScript, Reagent and logic Flux, and Luminus has an exact template for this: http://www.luminusweb.net/docs/clojurescript.md#reagent.
We just need to add the parameter +cljs and we will have a project basis with reagent.
Also, according to the Walking Skeleton the frontend should be responsive, and Luminus uses Bootstrap, which is a CSS responsive framework. Great!
For more information of Luminus framework, see: http://www.luminusweb.net.
Create the frontend project
Type this in a command line: lein new luminus frontend + cljs
This will generate the project structure for us.
In a new terminal, type: lein cljsbuild auto
The “lein cljsbuild auto” is the instruction to compile the ClojureScript code that is inside the “src-cljs” folder.
The “auto” setting guarantees that when we save the changes in a ClojureScript file, the compilation process that generates the JavaScript code will run automatically.
Once this is done, we must type “lein ring lein server”, which will automatically open a browser window to http://localhost:3000/ which is the default localhost port.
Now, we have the basis to begin developing the frontend.
Add openpgp.min.js
The file /frontend/resources/templates/home.html contains the base template code. In an earlier version of Luminus that we used the file is called “app.html”, so in the repository you will see that this file has that filename.
In this file add the js the OpenPGP.js that will be used later to decrypt in the client side the welcome page received from the micro service. We have to use the minify versión which you can download here.
Save this file in/frontend/resources/public/js/
You have to include it in home.html as follows:
Prepare the home template
We are going to reuse the home.html file to start writing our form. Just leave in thethe navbar, and the div with the id “app”, as follows:
Reagent will generate the menu in the div “navbar“, and center the page in the div “app“.
Create the Signup form with Reagent
Now, let’s create the sign up form, which will be our home.
In the folder /frontend/src-cljs/ we have all our code Clojurescript.
In the /frontend/src-cljs/frontend/core.cljs file we have the core code. Luminus comes with example code here, which we will definitely reuse.
We will define severals Reagent’s Atom that will help us manage the state of the form and the values of the components:
Now create some functions with Reagent to generate HTML code:
Both function atom-text-input and atom-text-area receive as parameters the id, the label, and the value, which is an atom.
Whenever the value of an [:input] changes, Reagent will render again the components. This is the logic of Flux.
So, let’s define the form:
As we can see, in this form there will be two fields to enter the username and the public key. This will be the first part of the sign up. The second part will receive the welcome page encrypted and decrypt it in the client side. Let’s modify the home function. Now we see:
Let’s change it to:
Consider this. The first thing you see is a let [doc (atom {})] and what it does is creating a Reagent atom locally, just for this function. By default it stores an empty map. Then, if the value of (:saved? @state) is false, it will show the Signup page form, calling the function of Reagent “bind-fields“. This function displays a form, and assigns an atom to save the values. It also has a callback. Below we see that we use the Reagent component :button, where we define that the onClick event fires the save-doc function. Let’s write the save-doc function:
When we perform a form submit, if the username and public key are not empty, the form values will be sent by POST to the route “/save”. With the help of Compojure, we define that when a POST request comes to “/save”, it receives the data and calls the micro-service sending the parameters, and finally returning the welcome page. This is explained below in section 3.5.
We receive the response from the micro-service into the atom encrypted-message.
If the response is equal to “user-exists ” then will show an alert to the user telling that the username is already in use. Otherwise, we will have the welcome page encrypted in @encrypted-message.
Then, we modify the atom state to true doing:
According to the logic of Flux, when the state of an atom changes, Reagent will render again. So again the home function will be executed. This time (:saved? @state) will be true. If the value of (:saved? @state) is true, the second part of the Signup form (where the user enters their passphrase and private key) are displayed. Then, it comes the welcome-page-form-component function, which we define below along with the other functions we need:
The function welcome-page-form-component will show us the second form, with the “passphrase” and “private key” inputs.
The user must complete both fields to decrypt the welcome page, as he’s the only one who knows this information.
When the button “Show my welcome page!” is clicked, the function decrypt-welcome-page is called:
This function validates if the input data is empty. If it’s not, then it calls the javascript function decrypt_message which will decrypt the welcome page. The decrypt_message is a simple javascript function that uses the OpenPGP.js library:
You can copy/paste this function and save it into /frontend/resources/public/js/functions.js. Remember to add it to the home.html file, this way:
Finally, once the welcome page is decrypted, we store the text into the atom decrypted_message, and then we change the value of (:page @state) so that the content of the welcome-page-component component is displayed
Configure the “/save” route with Compojure
Let’s configure the “/save” route to receive the form and send it to the micro-service, adding to /frontend/src/routes/home.clj the following functions:
We will use Compojure to define routes, and define that when a POST request arrives, send parameters to the “save-document” function.
The save-document function sends the form data to the micro-service doing a client/post function (clj-http.client) that allows us to make an internal call to a url, sending POST parameters.
Notice that the url of the micro-service is defined in a environment :ms-user-url. This environment variable can also be created in the project.cljs adding the following line in the dev profile:
:env {:dev true :ms-user-url “http://localhost:8080/signup”}
Important: When you deploy the application, you must create the environment variable MS_USER_URL (to be read by Clojure as :ms-user-url) in the production environment.
You can see the complete code (with the Login part) in the repo.
Conclusions
We discussed the concept and importance of a Walking Skeleton. We also mentioned some of the most interesting features of Clojure and ClojureScript.
We saw step by step how to build a Clojure app composed by a micro-service and a frontend, following the Walking Skeleton’s definition.
With Clojure, we learned new ways of development, with new programming paradigms, tools, and new ways to create beautiful UI. Also, We learned the logic of micro-services, allowing an application to scale much easier.
Thanks so much for reading all of this. Please feel free to contact me!
I look forward to hearing comments or questions from you!