Let me preface this post by saying that PhoneGap, Ionic, Titanium and Cordova are fantastic, easy to use tools which allow us to garner the simplicity of Javascript within iOS. They bridge a very wide gap between web and native in several useful ways and each of those frameworks is optimized for different types and ranges of apps.
At AgilityFeat we have been developing and experimenting with these and other tools quite successfully for a while now.
With that said, the following is a quick and easy way of getting a javascript graphics app into an iOS app, with full access to a device’s GPU, without going through the trouble of relying on third party tools.
This allows for great performance at a fraction of the disk space cost.
“Why isn’t everyone doing this?” you ask. In short, it is because you basically have to build from scratch ways of communicating your Javascript app with native components.
So if you’re looking to simply translate a Javascript app so that you can showcase it on your iPhone or iPad, or even to get it up on the app store, and you don’t need quick and easy access to native features, such as in-app purchases, GPS, multiple pre-built views, etc. This tutorial is for you.
What you’ll need
- A Mac with XCode installed in it
- Git
- NodeJS
And that’s basically it. This tutorial provides a basic app for you to use. I’d suggest sticking to that for now so you familiarize yourself with the workflow.
How the concept works
We’re going to be using an Open Source tool, built by yours truly, called iOSify.
Essentially, iOSify is a base for you to build your html application within, and it includes a set of tools which grab your html, javascripts, css and even images, and compress them down to a single Objective C class.
This Objective C class will hold a string which we will feed later to the WKWebView component for it to run.
Go ahead and download iOSify using git:
https://github.com/agilityfeat/iOSify
and from your terminal navigate to the path of the downloaded repo.
Follow the installation instructions, which are basically to install NodeJS, Grunt, and the dependencies.
Now, before we move along let’s take a look at what iOSify looks like:
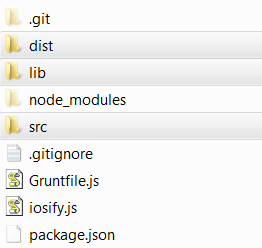
As you can see we have three folders and a few files. For now let’s ignore the files on the root of the repo and focus on the folders and their contents.
The dist folder will contain the resulting Objective C header and class files which we will be using a little further down the line.
The lib folder contains common library files (such as ThreeJS) just for convinience, making it easy to update all libraries using a script or even adding them as git submodules if you want.
The src folder contains the app we are going to be compressing. If you open it up you will see it already has contents:
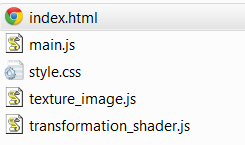
Go ahead and double click the index.html. You should be looking at this:
We’re not going to delve in detail about how the app itself is built. It is simply a demo app which uses nothing but ThreeJS.
Two things are important about this app, though, which you should consider implementing on your own apps so that you percieve the best view and performance possible.
The first thing is that within the HTML we’re using two meta tags to scale the app correctly to the viewport of our device:
<meta content='width=device-width, initial-scale=1' name='viewport'></meta>
<meta content='yes' name='apple-mobile-web-app-capable'></meta>
Secondly, the cube which you see gleefully animated within the browser window is built using ThreeJS. But in order to optimize the performance by forcing GPU to be used to calculate its geometry and pixels rather than CPU (you know, the whole WebGL layer thing this is all about), we applied the texture and animated the cube using GLShaders; or at least a flavor of GLShaders, the ThreeJS flavor.
For more details be sure to check out the file transformation_shader.js inside of the src folder and this fantastic post about using Shaders in ThreeJS.
Moving on, now that you have your iOSify app ready, lets fire up the compression of the files.
Within the iOSify root folder, on your terminal, type the following command and hit enter:
$ gruntThat’s it, you should now see the following:

Which means that on the dist folder you now have an up-to-date MyCube.h and MyCube.m files.
Now the fun begins
Let’s head on over to XCode.
For agility’s sake (pun intended) I have pre-packaged an XCode project which you can download, using git, from:
https://github.com/agilityfeat/WebGL-iOS-Demo
Fire up XCode and open up the project you just downloaded.
First thing to notice is that XCode will be complaining about the missing MyCube.h and MyCube.m files:

Let’s fix this, in our finder, by bringing over the files from the dist folder in iOSify to the WebGLDemo folder inside the project.
Press Command + Shift + k or on the menu select Product -> Clean in order to force XCode to update the missing links.
And she’s ready! Press Command + R or select Product -> Run on the menu to see your HTML app in action.
Nice, isn’t it?
How the code works
First. If you notice on the project theres a class called WebGLViewController.
This is a UIViewController which contains the WebGLView. It has a couple of extensions (WKScriptMessageHandler and WKNavigationDelegate) which are necessary to allow communication between native controllers and the Javascript app as well as to know when navigation events happen.
The magic sauce within WebGLViewController which allows WKWebView to use our HTML app is this:
  self.myCube = [[MyCube alloc] init];

  NSString *path = [NSString stringWithFormat:@"%@.%@", @"com.example", @"index.html"];
  NSURL *url = [NSURL fileURLWithPath:[NSTemporaryDirectory() stringByAppendingPathComponent:path]];

  NSData *data = [self.myCube.moduleString dataUsingEncoding:NSUTF8StringEncoding];
  NSError *error = nil;
  [data writeToURL:url options:NSDataWritingAtomic error:&error];

  NSURLRequest *request = [NSURLRequest requestWithURL:url];

  WKWebViewConfiguration *glConfig = [[WKWebViewConfiguration alloc] init];
  [glConfig.userContentController addScriptMessageHandler:self name:@"interOp"];

  self.webView = [[WKWebView alloc] initWithFrame:CGRectMake(0.0f, 0.0f, frameRect.size.width, frameRect.size.height) configuration:glConfig];
  self.webView.navigationDelegate = self;

  [self.webView loadRequest:request];
  [self.view addSubview:self.webView];
Breaking it down, first I generate a temporary file name for our html file:
  NSString *path = [NSString stringWithFormat:@"%@.%@", @"com.example", @"index.html"];
  NSURL *url = [NSURL fileURLWithPath:[NSTemporaryDirectory() stringByAppendingPathComponent:path]];
On this occasion I’m prepending @"com.example" to the file name, but it should generally be an UUID specific to the app that is generated only once.
Next we write the HTML string stored within the MyCube class to the file we just specified:
  NSData *data = [self.myCube.moduleString dataUsingEncoding:NSUTF8StringEncoding];
  NSError *error = nil;
  [data writeToURL:url options:NSDataWritingAtomic error:&error];
We generate a request pointing to the file we just created:
NSURLRequest *request = [NSURLRequest requestWithURL:url];And we load it:
[self.webView loadRequest:request];Before I finish this article, let me guide you over a few important details.
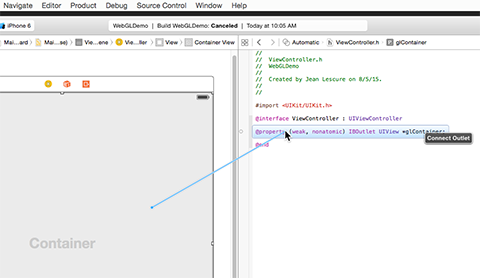
Heading on over to the storyboard, you can see I placed a container view, which is meant to hold the WebGLViewController as one of its subviews, in order to make it easier to add constraints.
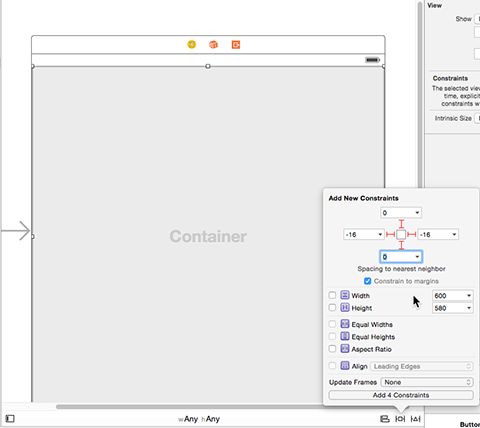
Make sure to connect the outlet (using Control + Click and hold) to the main view you use so it can be called later from the code:
When initializing the WebGLViewController, I made sure to make it as painless as possible by adding an initWithFrame method so you don’t have to worry yourself much with sizing and positioning issues.
A good word of advice is to make sure to wait until the view appears before instantiating the WebGLViewController, like you’ll see on the ViewController.m file:
-(void)viewDidAppear:(BOOL)animated {
    self.webGLView = [[WebGLViewController alloc] initWithFrame:self.glContainer.frame];
    [self.glContainer addSubview:self.webGLView.view];
}
I have noticed some pretty wonky behavior otherwise.
And that’s a wrap!
Be sure to drop us a line if you have any comments or doubts.
Happy coding.
Recent Comments